This article on Risk and Reward in Trading is the opinion of Optimus Futures.
Risk and reward are fundamental concepts that we consciously (and subconsciously) use in our decision making in all aspects of our life. Trading – being a mental battle – is no different. Good traders have a solid understanding of risk and reward ingrained into their trading methods and it is reflected in their day to day trading decisions – including the decision to avoid certain trade setups.
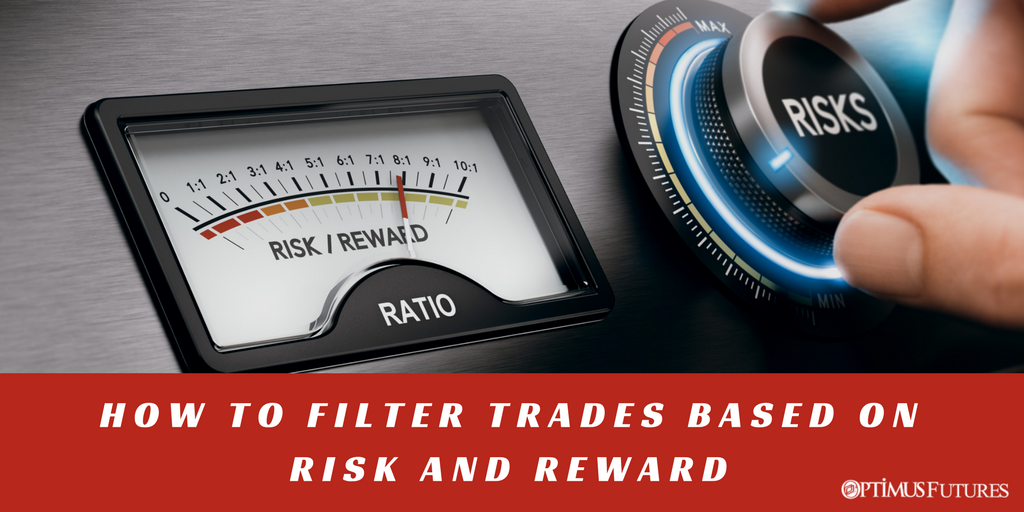
Using Risk to Reward Valuation in Trading
At its very core, the implications of risk and reward in futures trading – or any financial market per se – are very simple. A trader objectively evaluates the amount of capital he or she wishes to expose to a favorable market condition and evaluates the potential for reward against the risked capital. Ideally, a trade should only be executed when the anticipated gain or reward from the trade matches or exceeds the risk being undertaken.
Put into application, assume a trader wishes to buy into a market at a price point of 125, and has reasons to place the stop loss at 120 and expects the market to climb to a price level of 140. The trader here is risking 5 ticks (125 – 120) for a potential gain of 20 ticks (140 – 125), resulting in a risk to reward ratio of [5:20] or 1:4. Now if the trader wishes to risk 1% of his account equity on the trade, he can expect the trade to yield 4% in profit if it plays out as per expectations.
However, it is fairly common to see traders often complicating the perspective of risk and reward leading to complex and often botched decision making in their trading. A primary reason has to do with the subjective nature of the “reward” element of the analysis. But we will get to it at a later section. First we’ll address the simpler “risk” factor:
The Risk Aspect
It is relatively easier and a rather objective task for a trader to determine the portion of capital to be risked on a trade. For most traders, it is usually a fixed percentage of their capital, for example 0.5% or 1% per trade.
For some advanced traders who understand the varying probability of success for different trade setups, the risk factor could be defined in a range. For example, from 0.5% for an aggressive trade setup to 1% or 1.5% for more conservative higher probability plays.
There will obviously be other factors to consider as well like the frequency of trading, the individual risk appetite of a trader, nature of trading and access (or lack of) to adequate capital.
A day trader taking 20 trades a day could easily and swiftly burn through his trading capital risking 1% per trade while a longer term swing trader who takes two to three trades a month could risk slightly more per trade as the lower trading frequency caps the overall capital exposure in a given time period. Similarly, an aggressive trader trading a strategy that relies on fewer “home run” trades to cover several smaller losses for example would require a conservative risk appetite per trade, compared to a different strategy that provides fewer high probability trade setups.
Likewise, poorly capitalized traders often fall in the trap of risking more per trade in an attempt to extract more value from their winning trades – much to their eventual disappointment. Adequately capitalized traders on the other hand suffer less from this problem and are usually more content with conservative risk benchmarks.
No matter how many factors you put in this subject, at its heart, the aspect of determining risk per trade is usually a straightforward and preemptive process that traders are usually able to figure out with some basic trial and error, depending on their personalized trading circumstances.
Now let’s consider the alternate perspective of Reward which is usually the bigger culprit for most traders who struggle with using risk and reward effectively in their trading:
The Reward Aspect
We explained earlier that using risk and reward in trading entails evaluating risk against “potential” reward on a particular trade setup. The reason this aspect gets tricky is that it is virtually impossible for a trader to determine beforehand what the outcome on the trade will be, hence making it technically impossible to arrive at an objective risk to reward ratio for a trade setup.
Well, except some extraordinary trading methodologies that outright chase a particular risk to reward ratio for a complete trade. An example would be entering the market with 1% risk and closing the trade out at a 2% reward. Such methods are usually only found in limited popularity among scalpers or other higher risk traders who do not use market developments and dynamics as a core principle for their exit strategy. For the purpose of this article, we are addressing the vast majority of traders and trading methods that use market principles for entries AND exits.
So how can a trader safely go about assuming a particular risk to reward ratio on a trade?
First Trouble Area Approach
A common method that is often successfully implemented by traders is using the “first trouble area” approach. As the name itself suggests, the first trouble area for a trade would be the most immediate price level that the trader believes could possibly hold price up resulting – in the worst case – in a bounce off that level threatening the viability of the trade call.
This approach calls for the trader assuming a conservative outcome for the trade – that is the market bouncing off the first trouble area. Assuming that in a situation like this, the trader would take action to close out the trade, the trader employs the distance from the entry to this first trouble area to arrive at the risk reward ratio for the trade.
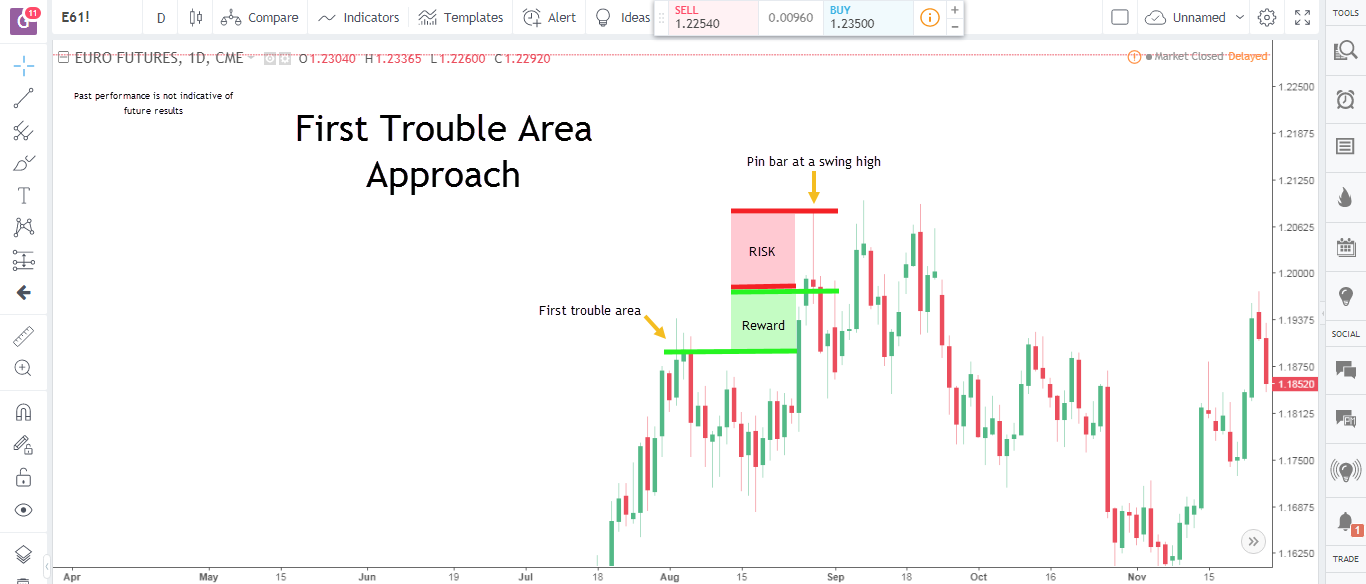
The chart above illustrates the first trouble area approach at work. We consider an example of a trader selling in the above market at the close of a bearish pin bar candlestick pattern, with a stop loss above the high of the pin bar and the first trouble area being used to evaluate a conservative reward value for the trade. The region marked red represents the risk on the trade, and the region in green represents the potential reward and comparing their areas suggest this trade based on the first trouble area approach is yielding a near 1:1 risk:reward ratio.
You will note that the market actually pushed a little lower than the first trouble area and into a denser area covered by multiple candlestick highs representing possibly stronger support than the first trouble area.
The general problem that traders often face with this approach is that in most market conditions, the first trouble area will usually not be far enough to result in a 1:1 or better risk: reward ratio. Also for particular trades, a trader might be reasonably confident of a move further away from the first trouble area possibly because of the strength of the setup, which should ideally reflect in the risk to reward ratio. Let’s consider an alternate approach that does provide a bit more leeway to the trader in this regard:
Major Trouble Area Approach
This approach, again as the name suggests, calls for the trader calculating the distance between the entry and a “major” trouble area that he or she anticipates price to be reacting at, for the calculation of the reward element of the risk to reward ratio. The major trouble area could be the first trouble area (if it is also a major trouble area) or a subsequent important area further away past the minor trouble areas.
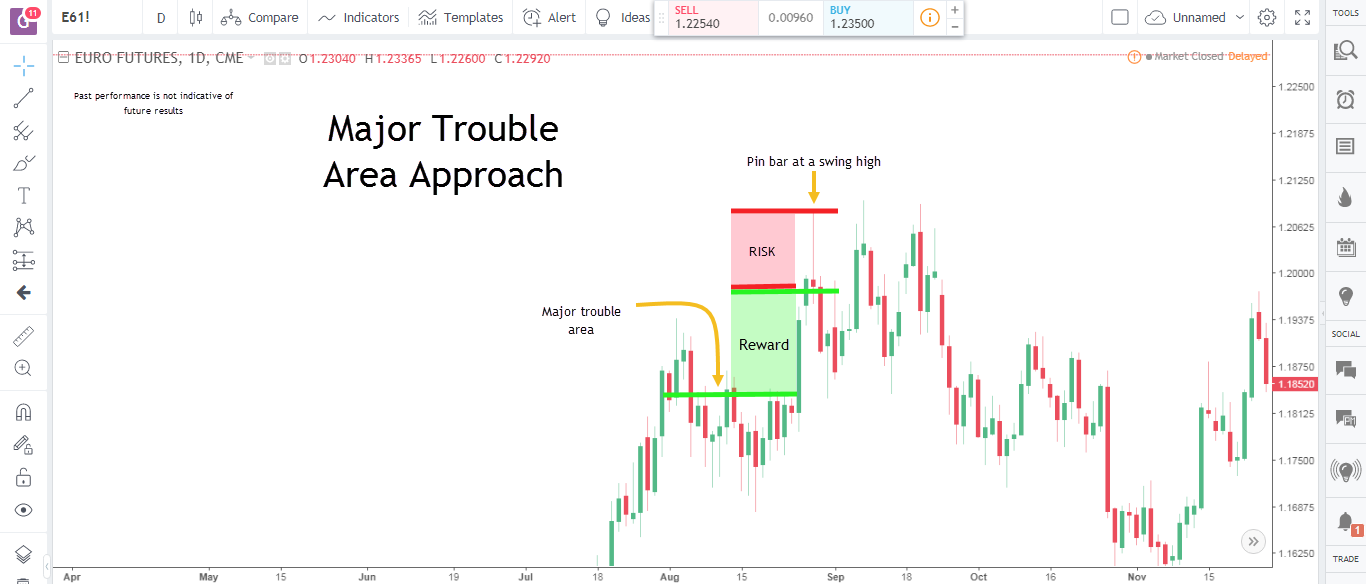
We have taken the same example to elaborate this approach for a more apples to apples comparison. You will note above two distinct changes. Firstly, the trader is now looking past the first trouble area towards the major trouble area in this case marked by a stronger former support zone as shown in the chart above. Assuming the same setup and trading plan, you will notice how the area in green is now noticeably larger than the red area representing risk thereby yielding a risk:reward ratio of better than 1:1.
The market did actually make it to the major trouble area, and in this case the trader’s application of the major trouble area approach would have worked well.
The obvious advantage here is a more realistic risk to reward ratio that accounts for a trader’s own expectations of the outcome of the trade. However, on the flipside, it also requires sound judgment from the trader as well. For newer traders, this can be a hard feat to achieve as every trade taken is normally expected to perform very well mainly as a result of emotions rather than concrete evidence driven from prevailing market conditions. For these traders, following such a strategy will often result in artificially attractive risk to reward ratios that are not very useful.
As a general recommendation, it would be wise for newer traders to begin with more conservative measures of risk to reward ratios as determined by the first trouble area approach and gradually, with experience and the resulting confidence, adopt the advanced major trouble area approach for a more realistic measure.
Bear in mind that a risk to reward ratio of 1:1, or for that matter [1:10], in itself means nothing and is a probabilistic measure that hinges on expected trade outcomes. It is therefore more logical to be using a strategy that allows you to arrive at realistic numbers even if it means having to pass on a trade setup due to an unfavorably low risk:reward.
There is a substantial risk of loss in futures trading. Past performance is not indicative of future results.